- You are here:
- Home »
- Blog »
- FAQs
- » How Often to Replace The Cabin Air Filter

How Often to Replace The Cabin Air Filter
Worried about the reduced air flow and noisy fan in your car AC? The fault may lie with the cabin air filter. A clogged filter can trigger many issues from reducing performance of your AC to serious issues like bad odor and worse causing the AC motor to burn. A clogged filter will not function effectively causing the AC to work more leading to damage to the motor.
More...
So, I can hear you ask, ‘how often to replace the cabin filter?’ The replacement depends on several factors which we will elaborate in this guide and also on how to replace the filter on your own.
Before we move on to filter replacement, let us see what the cabin air filter does and why it is important to replace it.
How Often to Replace The Cabin Air Filter
Role Of Cabin Air Filter
Cabin air filter serves the primary purpose of filtering the air that gets inside the cabin of your vehicle. It is present in the rear side of glove compartment or under the car’s hood or the dashboard. These can be found in all vehicles made since 2000.
The dust, smog, mold spores and pollen in the air are prevented from entering into the cabin via the HVAC system of your car. The filters also pick up unwanted debris, leaves and even rodent droppings. In short, the air filter helps improve quality of air entering your car.

Image source: bookmygarage.com
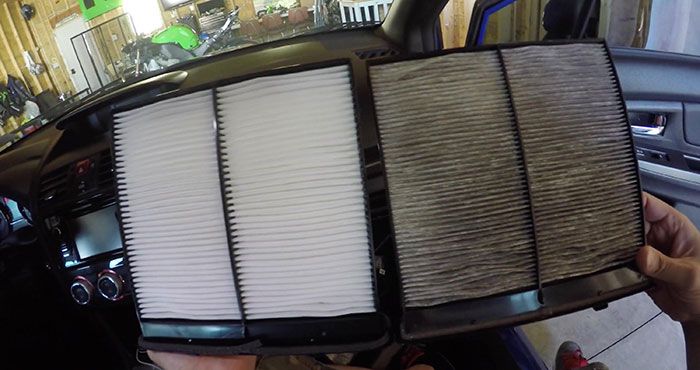
Why You Should Replace Cabin Air Filter
A clogged filter will not work effectively. The dirty air will cause the air conditioner to work harder and the blower motor can stop working or even burn in extreme cases.
Dirty and clogged filter does not filter the air inside the cabin and allows allergen filled air to enter the cabin. This results in a host of allergies and health problems. This is especially more in people who have known allergies to dust and pollen and other respiratory problems.
The engine works harder due to clogged filter resulting in higher emissions and loss of engine power and poor fuel efficiency.
The clogged filter can also cause under performance of the air-conditioning system.

How Often Should You Replace Cabin Air Filter
The frequency of the change depends on the two factors below:
- What Manufacturer Recommends:
The recommendation on changing cabin air filter varies from manufacturer to manufacturer. Some recommend changing the filter every 12000 to 15000 miles and others give a longer span.
- Driving Frequency And Atmosphere
However the truth is, the replacement depends on how often you drive and the environment you drive in. If you live in an urban area that sees heavy traffic and the air quality is poor, the filter should be changed once a year or even earlier than that. This also applies to a desert climate where the dust level is more.
What Are The Signs That Indicate The Filter Needs To Be Changed?
There are certain signs that will clearly indicate a filter change is necessary. These include:
- Reduced air flow to HVAC system. This is caused by the filter becoming clogged with dust and debris
- There is increased noise in the ac fan when you increase the speed. This is due to the fan working harder to bring in fresh and filtered air via the dirty filter
- Persistent bad odor is present when you switch the air on in your car
When Should You Check Cabin Air Filter?
Just before winter starts is the apt time to check the air filter in your cabin. The filter would have worked hard during the fall, summer and spring months when dust, debris and pollen are more. This will be the perfect time to have the filter changed, so it will be ready for when the warm weather sets in. It is best to record the mileage and date when you change the filter so you will know when the next change is due.
Locating The Air Filter
Cabin air filters present behind your car’s glove box is easy to access. You have to just free the glove box from the fasteners such as pins and clips, which need to be removed. The owner’s manual has the instructions.
If not done properly you can break the box while pulling it out. Or, you can use the guide below to remove the box for accessing the filter.
Here is a step by step guide on how to change filter present to the rear of your glove box.
Step 1 : Empty Glove Box
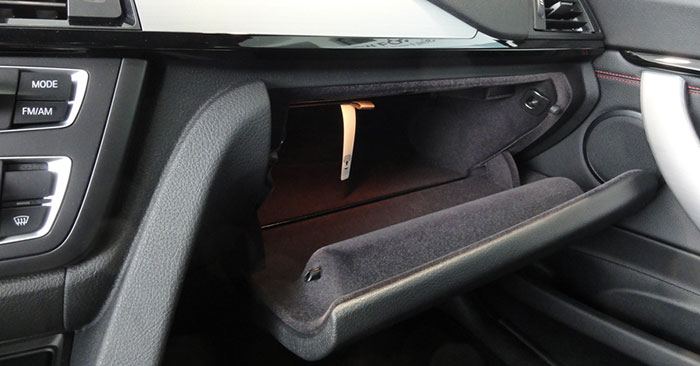
Image source: knowhow.napaonline.com
Open the glove box and empty its contents.
Step 2: Remove Limiting Stop Arm
Limiting stop arm is present on right side of glove box. You have to just slide the arm off the pin.
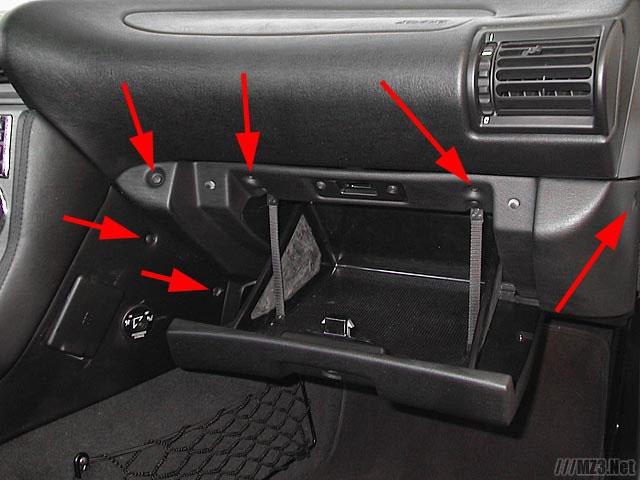
Step 3: Release Glove Box
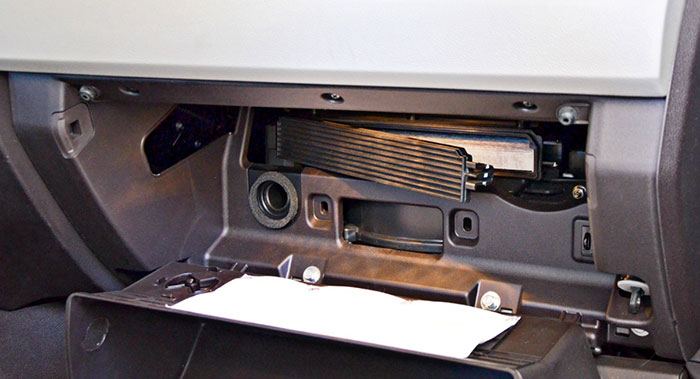
Hold glove box in back and front with a firm grip and squeeze the ends together until the clamps on the side pop free. When you have freed the clamps, you can drop the glove box down. Now the faceplate leading to channel of cabin air filter will be visible.
Step 4: Remove Cabin Air Filter
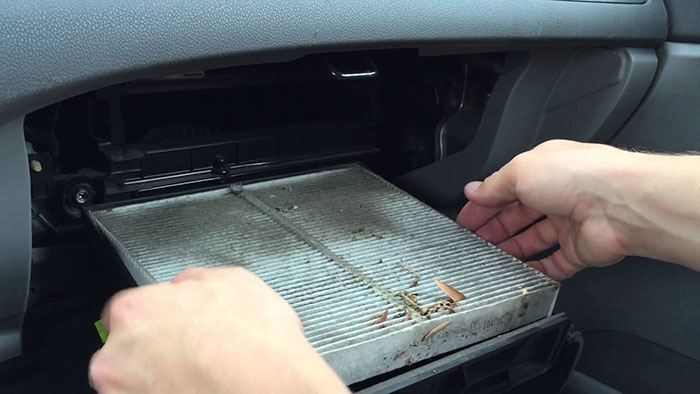
The faceplate has latches on its sides. Lift them and slide the faceplate away. Now you will be able to see the filter compartment. Pull out the cabin air filter. Since it carries a lot of dirt, trash and dust be careful while removing it or you may scatter all the debris around. Find out the direction in which the arrows face. This indicates air flow direction.
Step 5: Clean The Filter Chamber
Before you replace the old air filter with a new one, you should thoroughly clean the chamber in which the filter is present. To do this, use a vacuum. This will remove the dry debris and dust.
Use a damp rag to wipe the chamber off any contaminants left over. Also check the seals and gaskets for any wear and if needed change them too.
Step 6: Install New Filter
While purchasing a new filter ensure it is of the same type as your old filter. Check the arrows marked on the filter. They should be pointed in the direction as that of the arrows in your old filter. Now you can slide in the new one.
Step 7: Replace Glove Box
When you have placed the filter securely, replace faceplate. Place the glove box in place with the pins and clamps. Reinstall limiting stop and return the contents you had removed earlier to the glove box.
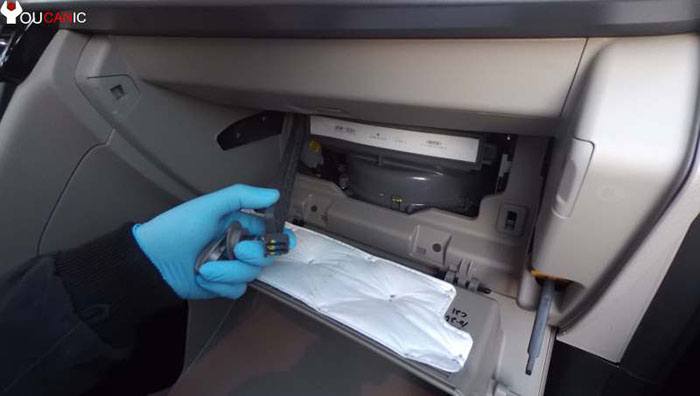
Image source: Youcanic
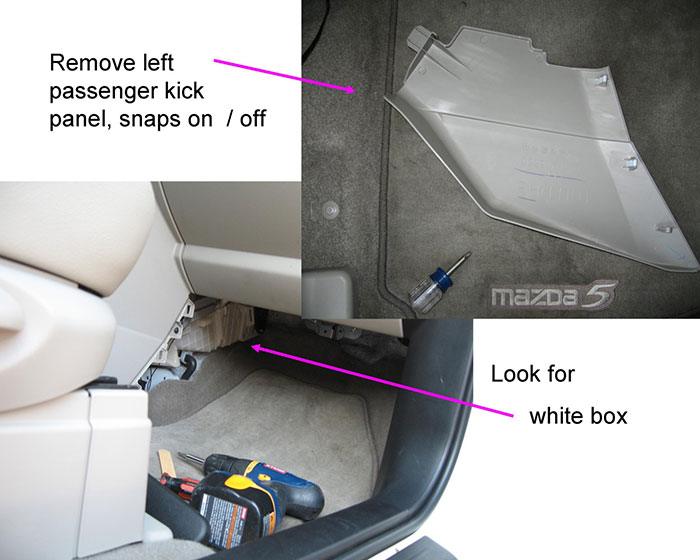
Method II: Cabin Air Filter under Dashboard
For filters present in other locations, such as under dashboard on passenger side, the process is much simpler. You have to just open a tiny access door present under the dash. Here are the steps:
Step I: Remove Dash Cover
Open the passenger door and remove mounting screws that are present in lower cover of dash. The bolts are of 8mm, 7mm or even 5.5mm, so look carefully lest you miss them. Once the bolts are removed lower the cover.
Step 2: Remove Old Filter
You will see a tiny strap or door that keeps the filter intact. Remove this by undoing the screws or clips. The owner’s manual will have instructions on removal as the process differs from vehicle to vehicle.
After removing retainer, slide cabin air filter out from the housing. Wipe the housing and dash cover with damp cloth. Check for any additional filter inside the housing as some vehicles have two filters.
Step 3: Install New Filter
Insert the new filter into the housing taking care not to damage it by forcing it. Align the retainer clips and plate or bracket in place. This will ensure there is no leak. When reassembling, be careful as the evaporator and heater core of the air conditioner are present close to the filter and can leak if damaged.
Replace retainer screws with a small wrench or socket. Check for tubes or wires that get trapped in the door.
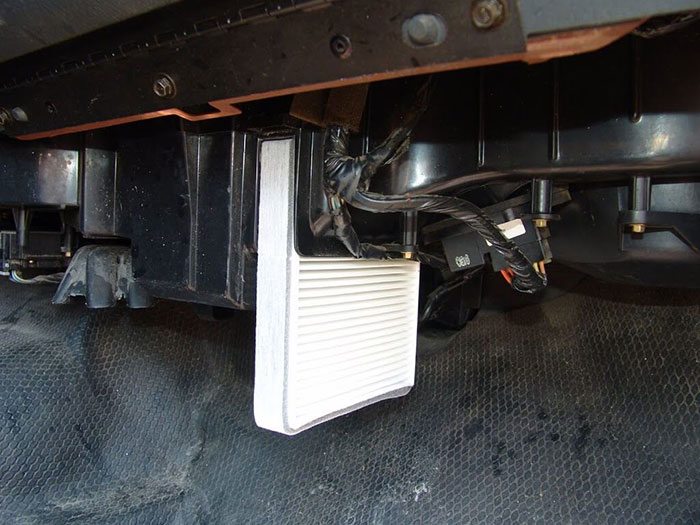
Image source: Sparky’s answers
Step 4: Reinstall Dash Cover
Now lower the dash cover, align screw holes properly and insert screws with hand to avoid cross threading and stripping. Use wrench or small ratchet to tighten.
Method II: Cabin Air Filter Under Hood
For filters under the hood, you may need to remove other parts like wiper blades, cowl vent louver housing, washer bottle and other such parts. The owner’s manual will have information on the specific parts.
The service manual will show you where the cabin air filter of your car is situated. In some cars, the filter may be referred to as air conditioning filter, dust filter or as micro cabin air filter in the manual.
Step 1: Locate Cabin Filter
Open the car hood and identify trap door that houses the filter using your owner’s manual.
Step 2: Remove Filter
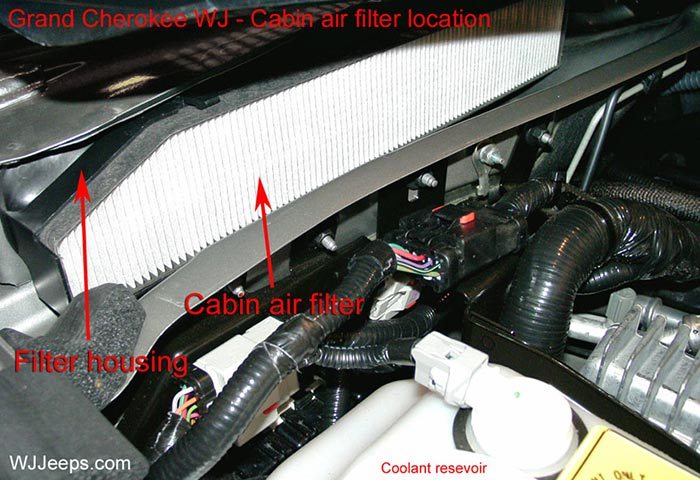
Image source: Cargurus
Lift access door and expose filter. Now gently slide the filter upward to remove it from air duct intake.
Step 3: Insert New Filter
Make sure the old and new filter match. Clean any dirt or debris in air duct intake before placing the new filter. Replace door cover.
Expert Tips: Purchasing Air Filter
It is easy to locate the filter and change it. But the toughest part of replacement is finding the right filter for your car. The main reason for this is the aftermarket parts are not up-to-date on the frequent changes done to filters. This is particularly true with filters present under dashboard where the space present is changed frequently.
Which Type Of Filter Is Best?
While purchasing the filter you have two types of filter to consider. One is a particulate filter and the other is a particulate odor combination. Some vehicles may contain only one of the two types, while in some you have both the filters.
If two filters are present, they will not be in a single box. And the part numbers of the filters will be different. This occurs when you have a filter present in air intake region and the other in HVAC case. The air intake filter will generally be of particulate type and is present to trap the small particles. The HVAC filter will have the odor particulate combination, which includes a charcoal layer that acts as odor control.
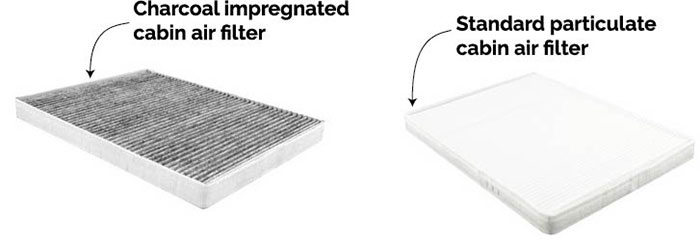
Image source: Rick’s Free auto repair
Generally aftermarket filters are of particulate type only. The odor particulate filter is sophisticated and expensive too. If you live in neighborhood that sees heavy traffic or you are particular about food odors, choosing the odor filter is ideal.
Otherwise the less expensive particulate filter is sufficient. It filters all the dirt and pollen particles effectively. The filter is electrostatically charged. In other words the fiber particles in the filter carry negative or positive charge. When airborne particles of opposite charge are present they are attracted to the filter.
Mechanical filtration via the pores also helps to trap dust and other particles that are bigger than the pores. Charcoal layer is present mainly to remove the odor. It has activated charcoal or charcoal layer treated with heat and chemicals for odor control. Charcoal layer of good quality can even trap noxious gases.
Now that you know about cabin air filters, the importance of replacing them and the method to do it you can be assured you breathe in fresh air always and also avoid expensive repair costs due to ac motor damage. We hope you liked our tutorial on how often to replace cabin air filter. If so, please post your comments below and don’t forget to share this guide on social media.
Related Posts
What are toll roads, and how to pay the tolls?
Are Dodge Chargers Expensive to Fix?
Fleet Fuel Cards for Optimal Car or Truck Expense Tracking
Top Simple Ways to Improve the Look of Your Car
A look under the hood of Waymo robotaxis